.png)
This year we developed a Progressive Web App to satisfy a client who needed an app that could work offline, and needed it fast. When they first presented us the challenge, the obvious solution was a native app. But after a little research, we discover that a Progressive Web App (PWA) could suit our needs of fast and continuous delivery along with offline capabilities. Here is the definition from Google’s “Learn PWA!” guide:
Progressive Web Apps (PWAs) are web apps built and enhanced with modern APIs to deliver enhanced capabilities, reliability, and installability while reaching anyone, anywhere, on any device, all with a single codebase.
PWAs have been around for a few years but I still consider them a “vanguard” technology. Although you can find good introductory tutorials, information about specific problems or implementations (i.e. integration with Rails) is not easy to find, or it is likely to be outdated.
In this series of posts you will learn how to:
- Set up the necessary files to turn your app into a PWA (and make sure Rails knows where to find them).
- Write a Service Worker that uses Google’s Workbox library to cache assets and routes, and provide a sensible fallback.
- Use the Background Sync API, IndexedDB and StimulusJS to allow your app to perform CRUD actions while being offline.
Let’s jump into it!
The main ingredients
NOTE: For this post I will assume that you have a basic Rails 7 app up and running, with the default asset pipeline. The Rails version is not as important as the fact that I’m not using a bundler to compile my assets. Instead, Rails 7 now uses import maps directly. This avoids cumbersome transpilation processes. You can read more about that here. I chose this method because it’s straightforward and it does not rely in gems such as serviceworker-rails (which can be useful if you’re using Webpacker).
There are two key files to turn your app into a PWA, and they must be served from specific paths:
- A service worker, available at /service-worker.js . The service worker is like a small application that runs in parallel to your Rails app. The user does not interact with the service worker directly, but the service worker interacts with your application, intercepting requests and providing functionalities that we will cover in the next post of this series.
- An app manifest, available at /manifest.json . This file will tell the browser how your PWA should display within the operating system of your user’s device. This file is key to make your app installable and thus to make it look and feel like a native app.
The path of the service worker is especially important because the scope of the service worker is given by the path of the file. For most cases, we will want our service worker to be served from the root path, so it works for all pages in our site.
So how do we do it?
The recipe
After a couple of failed attempts using different gems to tell Rails where to look for my files, I decided to try the approach described in this post, with some modifications in the way I load and register the service worker. It works like a charm and the best part is that uses “the Rails way”, in other words: it loads the files using routing and controllers.
Step 1: Create a service worker controller
# app/controllers/service_worker_controller.rb
class ServiceWorkerController < ApplicationController
protect_from_forgery except: :service_worker
skip_before_action :authenticate_user!
def service_worker
end
def manifest
end
end
The skip_before_action method is only useful if you’re using devise. We skip the CSRF protection and devise authentication to allow our service worker to be served without authentication or forgery request problems.
Step 2: Routes
# config/routes.rb
get "/service-worker.js" => "service_worker#service_worker"
get "/manifest.json" => "service_worker#manifest"
These routes will match the URLs with the actions in our service worker controller.
Step 3: Add your service worker and manifest
This is my favorite part: because we created controller actions and routes for the service worker and app manifest, these files can now be served as view templates from your views/service_worker directory!
manifest.json
This file will make your app installable. So go ahead and choose a name, icon and color for your “native-like” Rails application. The icon size must be between 144x144 and 512x512. I used json.erb to dynamically generate the path for my icon with the image_path helper.
// app/views/service_worker/manifest.json.erb
{
"short_name": "YourAppName",
"name": "YourAppName",
"id": "/",
"icons": [
{
"src": "<%= image_path "your-fancy-icon.png" %>",
"sizes": "144x144",
"type": "image/png"
}
],
"start_url": "/",
"background_color": "#000000",
"display": "standalone",
"scope": "/",
"theme_color": "#000000"
}
Then we require the manifest in the application layout, and we add support for CORS with the crossorigin attribute. Add this line above your stylesheet link:
<!-- app/views/layout/application.html.erb -->
<link rel="manifest" crossorigin="use-credentials" href="/manifest.json" />
service-worker.js
We will not cover the content of the service worker yet — there will be a dedicated blogpost for that. In this stage, we just want to make sure that our service worker is being properly loaded. We will add logs for the main events to begin to understand the service worker lifecycle.
// app/views/service_worker/service_worker.js
function onInstall(event) {
console.log('[Serviceworker]', "Installing!", event);
}
function onActivate(event) {
console.log('[Serviceworker]', "Activating!", event);
}
function onFetch(event) {
console.log('[Serviceworker]', "Fetching!", event);
}
self.addEventListener('install', onInstall);
self.addEventListener('activate', onActivate);
self.addEventListener('fetch', onFetch);
Step 4: Write the companion JS and place it in the asset pipeline
If the service worker is like a small application that runs in parallel to your Rails app, the companion is like the bridge between the two. It tells your application when and from where to load your service worker.
// app/javascript/custom/companion.js
if (navigator.serviceWorker) {
navigator.serviceWorker.register("/service-worker.js", { scope: "/" })
.then(() => navigator.serviceWorker.ready)
.then((registration) => {
if ("SyncManager" in window) {
registration.sync.register("sync-forms");
} else {
window.alert("This browser does not support background sync.")
}
}).then(() => console.log("[Companion]", "Service worker registered!"));
}
We first check if the browser supports service workers, and if so, we register ours under the root scope. We will go a step ahead and also check for background sync support. We then send a log to let us know when the service worker has been registered.
Now we need Rails to see this file, so we import it in application.js :
// app/javascript/application.js
import "custom/companion"
And since we’re using the default Rails 7 asset pipeline, we also need to pin the module in the import map:
# config/importmap.rb
pin_all_from "app/javascript/custom", under: "custom"
Wooah! That was a lot.
Now we’re ready to try out our implementation! Let’s take the thing out of the oven, no need to let it cool down :-)
Step 5: The PWA in action
Start the rails server and open the browser. Apparently nothing has changed. We need to open the browser console and we should see our companion and service worker logs! 🛠 🎉
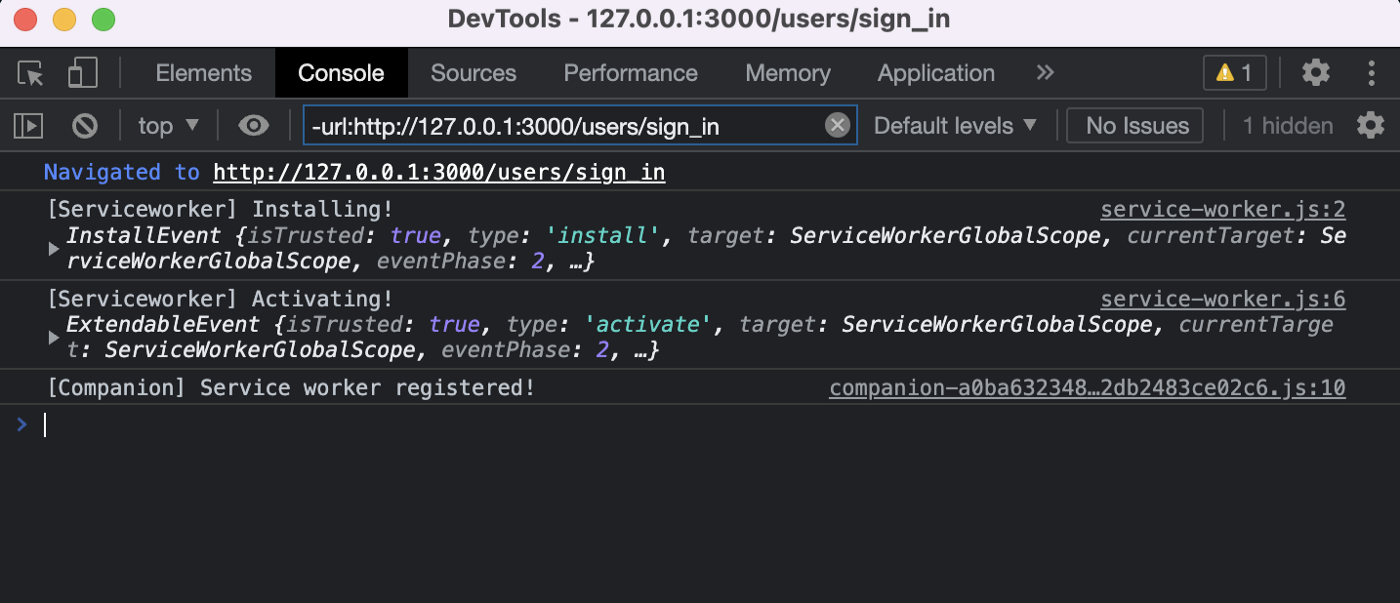
You should also see an icon in the address bar of your browser (it may vary depending on your OS and browser), or a prompt to install the app if you’re in a mobile device. After accepting, you should see the icon of your app added to your home screen. When you click that icon, your app will be launched in a standalone browser window.

Troubleshooting
- If your console does not show any logs, try adding a console.log("Companion loaded") in your companion.js to check whether that file is being loaded. If you still can’t see anything, check if your public folder contains a populated assets directory. If that’s the case, delete the content of the assets folder. Your browser is likely pulling the JS from that outdated directory.
- You might want to clean up your cookies, cache and site settings (in the “Advanced” section of your browser history) before testing the setup. You can also use an incognito window, which should work for everything except the install button/prompt.
Next steps
We have our main pieces together. Now is time to put that service worker to work, right? In the next post of this series we will be using Google’s Workbox library to build a fairly readable service worker that will cache our assets and pages, and provide an offline fallback. Don’t miss it!
Thanks to Jordán