
Introduction
Over the years I have had the opportunity to work on a variety of projects, some of which required a complete rebuild from the ground up, which most of the time means planning and executing a data migration. There are many reasons as to why a company decides to completely rebuild an application, but that’s a discussion for another day. Additionally, it’s worth saying that there are many other scenarios where a data migration is needed. In this blog post I want to elaborate a bit more about how to plan and execute a large data migration for a Ruby on Rails application. Data migrations can be a challenging and time-consuming process, but with the right planning and execution, you can complete the migration with minimal disruption and effort.
Let’s say a client, a fin-tech company, decides to rebuild its web application from the ground up, even changing the framework used in the first place and this requires a migration of 5 million records. But there’s another issue, your team built a PoC (proof of concept) app including features they wanted from a long time ago and it even went live for a few users.
Now, we can break the “project” into parts:
- Do a full rebuild of the application logic. From the original Django app to a new Ruby on Rails system. (Consider this is a live application)
- Plan & execute a data migration from the legacy system’s database to a new already existing schema, and do it with little to no downtime so it is seamless to the users of both apps.
In this blog post, we’ll focus only on the data migration piece. We’ll break down the steps for planning and executing a data migration for a Ruby on Rails application. From data preparation and planning to execution. So let’s get started!
Considerations
- Performance: Affects the speed at which the data is transferred and the reliability of the process. When performance is poor, the process can become slow and unreliable, which can lead to delays and errors. Additionally, poor performance can affect system resources, resulting in increased costs & time.
- Data integrity: Ensures that data is accurate and complete throughout the migration process. It is essential to maintain the integrity of the data during a data migration as it ensures that the data is accurate and can be trusted by the users. This is especially important when migrating data between different systems and databases like in this scenario, as incorrect data could lead to loss of business data.
Challenges
Based on the client requirements, this is the list of challenges the team identified prior to starting hands on with the migration planning.
- Time limit: Migrate all necessary data within 2 hours with no downtime.
- Different schemas: data structure is different between schemas and the business logic should remain the same. Data should be correct and complete.
- Authentication: In order to achieve the seamless experience, users from the legacy Django app should be able to sign in with their same credentials. Users from the rails app should continue to be able to login after the data migration as well.
Planning
Okay, once the scenario is clear, with considerations and challenges, it is time to plan the migration process. First of all, let’s create a dump from the original Databases so we can execute test runs and monitor performance without the risk of compromising the live application.
pg_dump - host=<database-host-url> - port=<database-port> - username=<database-username> - password - dbname=<database-name> > <name-of-dump-file>.sql
And we can populate a test database with this dump file, one option is using an RDS instance and connect to that with a database client such as DBeaver.
Next step is to start mapping the data between the legacy schema and the new existing schema. We need to understand how the data can be related with the new schema, which data is new to the Rails schema, which is a 1-to-1 mapping and which needs some kind of processing to be supported on the new app.
A spreadsheet is a good simple tool to work on this analysis.
Steps:
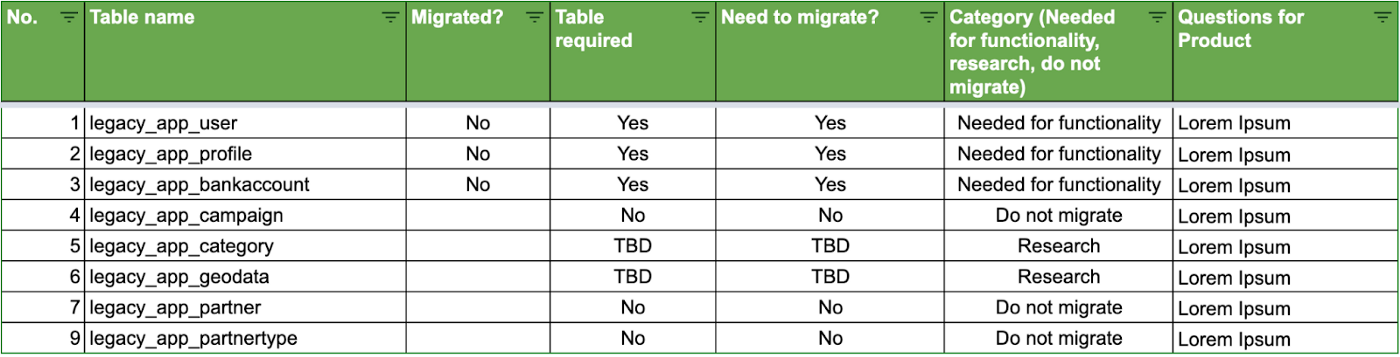
- Go over each and one of the tables from the legacy schema, add them to a table in a sheet and try to understand them in detail. For this step it is important to coordinate with Product/Client about which features are going to be kept, and which are scrapped. Here’s an example of a few tables.
- Create another Sheet for each table and compare column by column to identify the circumstance of the columns. Here’s an example:
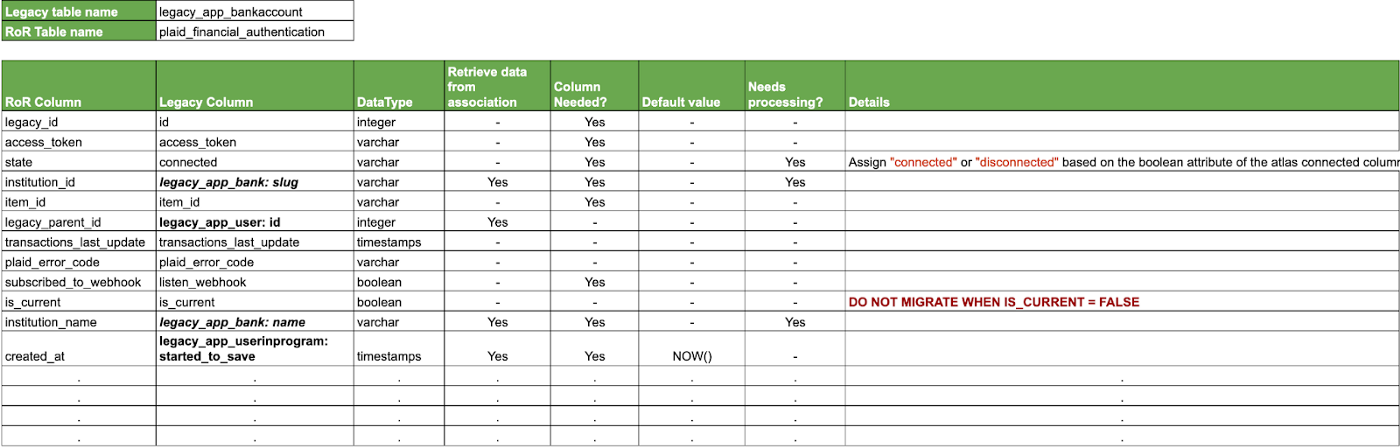
Important things to notice from the image:
- The RoR column has the name of the tables in the new schema
- The legacy column will help us identify where to get the data from.
- We can identify the data type we want to end up with.
- Some data is pulled from an associated table and not directly from the mapped table.
- We can define the default value of a column if needed after the migration.
- Columns that require some processing are flagged with the details about the operation needed. In this case, the team wants to support a state scalable functionality, so instead of having a boolean column ‘connected’ it will be transformed into a string.
-True will transform into connected
-False will transform into disconnected - Also let’s add a new column to the Ruby on Rails table to store the legacy id of the records, there are many reasons why this is an essential practice. We’ll explore more in detail later but some of those are:
- We can build relationships once the migration is done in the target database.
- We can compare data from both databases and confirm the migration was correct.
- We can fallback to the legacy database in case of any data corruption or issue.
Technical Approach
Database Setup
Ruby on Rails has a variety of tools that can be used to connect multiple databases. ActiveRecord can be used to create a unified interface for connecting to multiple databases. This allows for data to be easily shared between databases. That being said, let’s connect to both testing databases, we can follow the Rails guide for connecting multiple databases
Once we have both databases all set up we can start creating models. Let’s assume we have models for all Ruby on Rails tables already, so we would need to create models for the legacy tables.
First we’re going to create a base model under the Legacy namespace:
class Legacy::ApplicationRecord < ActiveRecord::Base
self.abstract_class = true
connects_to database: { writing: :legacy, reading: :legacy }
end
And now we can start creating models for each table we need to migrate and inherit the configuration from the base legacy model. Let’s try with the legacy_app_bankaccount table we saw before.
class Legacy::BankAccount < Legacy::ApplicationRecord
self.abstract_class = true
self.table_name = 'legacy_bank_account'
end
Authentication
The task of implementing the Django authentication algorithm into a Ruby on Rails app to allow legacy users to login is a complex job. It requires a deep understanding of both Django and Ruby on Rails, as well as the authentication algorithm itself. The process involves mapping the authentication algorithm to the relevant Ruby on Rails authentication methods and making sure that all of the necessary fields match up, without overriding the in-place authentication algorithm. Remember we have live users. For now I won’t dive into the technical implementation.
Migration Tasks
It’s time to start coding our solution. We’re going to create multiple tasks to achieve a successful migration. We can categorize our scripts into these three types:
- Transformation tasks: These will be responsible for normalizing the data based on the analysis we did on our spreadsheet before.
- Migration Tasks: In charge of executing the actual migration of data from one database to another.
- Relationships Tasks: In charge of building the relationships between migrated records back once migrated over to the new database.
Transformation
Transformations are risky because they depend on having random access to data for the legacy schema, transforming it yet keeping the integrity from the source data. To avoid the complications of transforming the data outside the source database, we recommend using materialized views. That way, the data can be transformed in place and prepared for migration.
In the following rake task we create materialized views from the legacy table, the idea is to have a temporary table with all the data transformed in the way we need for the target table. (Only the legacy_app_user & legacy_app_bankaccount tables are included in this demo rake task)
namespace :migration do
desc "Created the materialized view for users table"
task materialize_legacy_user: :environment do
puts "Creating materialized legacy_app_user table"
sql = <<-SQL
DROP MATERIALIZED VIEW IF EXISTS materialized_legacy_app_user;
CREATE MATERIALIZED VIEW materialized_legacy_app_user AS
SELECT
auth.id legacy_id, # Column that kept the same name & value
up.id legacy_uip_id,
auth.password legacy_encrypted_password, # Rename column to match target
auth.last_login last_sign_in_at,
auth.is_superuser,
auth.email,
auth.is_staff,
auth.is_active,
auth.first_name,
auth.last_name,
auth.date_joined created_at,
auth.username,
auth.marketing_link_id,
auth.can_receive_email subscribed_to_mailer,
auth.referral_link_id,
auth.facebook_id uid,
CASE WHEN auth.facebook_id IS NULL THEN null
ELSE 'facebook'
END provider, # Column that changed name conditionally
FALSE as migrated_password_flag, # New column with default value
TRUE as terms_and_conditions_agreement,
NOW() as confirmed_at,
up.program_id,
CASE WHEN program_id = 1 AND started_to_save >= '20 Jan 23' THEN TRUE
ELSE FALSE
END legacy_match_user
FROM (legacy_auth_user as auth
INNER JOIN legacy_app_userinprogram as up ON auth.id = up.user_id)
WHERE up.program_id IN (1,7);
CREATE UNIQUE INDEX materialized_legacy_app_user_legacy_id
ON materialized_legacy_app_user (legacy_id);
SQL
r = exec_query(sql)
puts r.inspect
puts ""
end
task material_atlas_app_bankaccount: :environment do
puts "Creating materialized atlas_app_bankaccount table"
sql = <<-SQL
DROP MATERIALIZED VIEW IF EXISTS materialized_legacy_app_bankaccount;
CREATE MATERIALIZED VIEW materialized_legacy_app_bankaccount AS
SELECT
legacy_app_bankaccount.id legacy_id,
access_token temp_access_token,
CASE WHEN connected IS TRUE THEN 'connected' # Here we do the transformation we discussed before
ELSE 'disconnected'
END state,
slug institution_id,
item_id,
legacy_auth_user.id legacy_parent_id,
transactions_last_update,
is_current,
name institution_name,
legacy_app_userinprogram.started_to_save created_at,
FROM (legacy_auth_user
INNER JOIN legacy_app_userinprogram ON legacy_auth_user.id = legacy_app_userinprogram.user_id
INNER JOIN legacy_app_bankaccount ON legacy_app_userinprogram.id = legacy_app_bankaccount.user_in_program_id
LEFT JOIN legacy_app_bank ON legacy_app_bankaccount.bank_id = legacy_app_bank.id)
WHERE is_current IS FALSE AND legacy_app_userinprogram.program_id IN (1,7) AND access_token != 'test_bofa';
CREATE UNIQUE INDEX materialized_legacy_app_bankaccount_legacy_id
ON materialized_legacy_app_bankaccount (legacy_id);
SQL
r = exec_query(sql)
puts r.inspect
puts ""
end
def exec_query(query)
Legacy::ApplicationRecord.connection.execute(query)
end
end
We can see in the second task how we addressed the transformations to the data we planned in our spreadsheet.
- connected column from the legacy table renamed to state and got assigned a string value based on the legacy boolean value.
- Some columns got renamed
- Some columns stayed the same
- Where clause statement filters out the records with is_current=false
We need to create some models to connect to the materialized views, here's a simple class for the bank account table:
class Legacy::BankAccountMaterializedView < Legacy::ApplicationRecord
self.table_name = "materialized_legacy_app_bankaccount"
self.primary_key = "legacy_id"
end
Migration
We reached the core of the process. We'll write the procedure to move the data from the materialized views we create with the transformed data into the target database. Keep in mind that performance is of utmost importance. With that in mind, we going for a raw SQL route. Otherwise, we would need to initialize and create records at an application level, which is terribly slower, 10 times slower.
- We'll create a task for each table, in this case two for the same two tables.
- We'll take advantage of PostgreSQL Cursors to improve performance. https://www.postgresql.org/docs/current/plpgsql-cursors.html
Rather than executing a whole query at once, it is possible to set up a cursor that encapsulates the query, and then read the query result a few rows at a time.
- After doing some testing we concluded that batches of 3000 would do the trick considering the resources we have. This will vary based on the worker & the Redis instance memory.
- To execute the actual injection of data into the new database, we'll make use of an handy gem called activerecord-import
One of its major features is following activerecord associations and generating the minimal number of SQL insert statements required, avoiding the N+1 insert problem
- Lastly we'll create a dedicated queue for the jobs that will inject the data into the database.
namespace :migration do
desc 'handle batching manually'
task import_users: :environment do
puts 'gathering data from legacy database'
beginning = Time.now
c = Legacy::ApplicationRecord.connection
c.begin_db_transaction
c.execute("DECLARE cur CURSOR FOR SELECT * FROM materialized_legacy_auth_user;")
r = c.execute("FETCH 3000 FROM cur");
while r.first != nil
ImportBatchDataJob.perform_later(r.entries.to_json, :user)
r = c.execute("FETCH 3000 FROM cur");
end
puts "Time elapsed user jobs: #{Time.now - beginning} seconds."
c.commit_db_transaction
end
desc 'handle batching plaid_financial_authentication'
task import_financial_authentications: :environment do
p 'gathering fin auth data from legacy database'
beginning = Time.now
c = Legacy::ApplicationRecord.connection
c.begin_db_transaction
c.execute("DECLARE cur CURSOR FOR SELECT * FROM materialized_legacy_app_bankaccount;")
r = c.execute("FETCH 3000 FROM cur");
while r.first != nil
ImportBatchDataJob.perform_later(r.entries.to_json, :financial_authentication)
r = c.execute("FETCH 3000 FROM cur");
end
puts "Time elapsed financial authentication jobs: #{Time.now - beginning} seconds."
c.commit_db_transaction
end
desc "start all data import"
task start_import: [:import_users, :import_financial_authentications, :import_bank_accounts, :import_profiles, :import_rewards, :import_plaid_errors, :import_transactions]
end
import_batch_data_job.rb:
class ImportBatchDataJob < ApplicationJob
queue_as :migration
def perform(rows, klass)
@klass = klass
@rows = JSON.parse(rows)
begin
import_batch = @klass.import(@rows, validate: false, on_duplicate_key_ignore: true)
rescue Exception => e
puts "Failed reason: #{e.message} expection: #{e}"
end
end
private
end
Let's create a separate task (start_import) to encapsulate the execution of the others tasks into one.
Relationships
Now that the data is migrated, what use is that data without the relationships between them? We need a process trace back the relationships and build them in the new database. Here's where the legacy_id & legacy_parent_id columns come into play.
namespace :migration do
desc "builds user and plaid financial authentications relationships"
task user_plaid_financial_authentications_relationship: :environment do
puts "User - Plaid Financial Authentications Relationships"
c = ActiveRecord::Base.connection
sql = <<~SQL
UPDATE plaid_financial_authentications
SET user_id = users.id
FROM users
WHERE
users.legacy_id = plaid_financial_authentications.legacy_parent_id
AND user_id IS NULL
SQL
r = c.exec_query(sql)
puts r.inspect
puts ""
end
end
At this point the application should be ready for use! You could let your users know the new experience is up and running. However, where not done if we want to ensure a successful migration.
Validation
Data validation after a migration is an essential part of any data migration project. This process ensures that all data has been successfully transferred between systems, without loss and that the data is accurate and up to date. Data validation also helps to identify and correct any errors that may have occurred during the migration. For this reason, I recommend testing the migration in a similarly sized staging environment. That way you can verify data integrity and performance of the migration.
An option is to apply a hash function into the migrated data and compare. Ruby Object implements a method for that (see reference).
So we can add a method to both new and legacy ActiveRecord models like this one for user:
def hash_record
id.hash + is_superuser.hash + email.hash + is_staff.hash + is_active.hash + first_name.hash +
last_name.hash + date_joined.hash + home.hash + username.hash + marketing_link_id.hash + can_receive_email.hash + facebook_id.hash +
referral_link_id.hash
end
And spin up a task to execute the validation:
namespace :migration do
desc "Validate users data integrity"
task validate_users_integrity: :environment do
ValidateImportedDataIntegrityJob.perform_later(:user)
end
end
As you can see we added a job to execute the validation, since we want to leverage threading here so we can accelerate the execution. The job is in charge of comparing both legacy and new tables and generate a CSV with the results and upload it to an S3 bucket.
class ValidateImportedDataIntegrityJob < ApplicationJob
queue_as :validation # Provision a particular
def perform(klass_name)
@klass_name = klass_name.to_s.capitalize
csv_file = build_validation_csv
obj = $s3.bucket(Rails.application.credentials.s3_bucket).object("validations/#{@klass_name}_validation.csv")
obj.put body: csv_file
end
private
def get_migrated_record(record)
klass.legacy.find_by(legacy_id: record.id)
end
def klass(klass_name)
klass_name.constantize
end
def legacy_klass(klass_name)
"#{klass_name}::Legacy".constantize
end
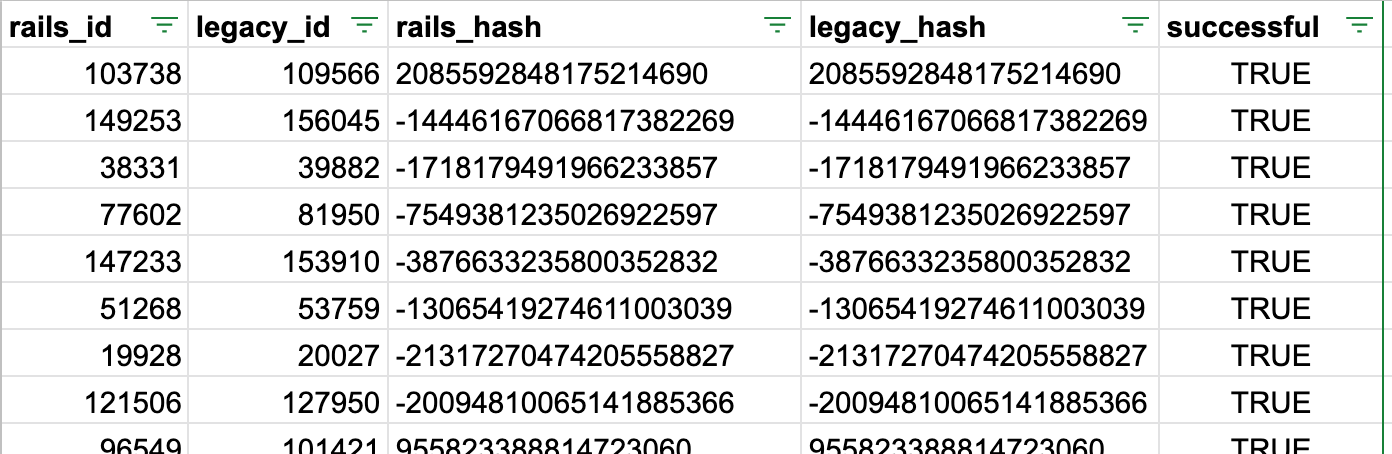
def build_validation_csv
headers = ["rails_id", "legacy_id", "rails_hash", "legacy_hash", "successful"]
CSV.generate do |csv|
csv << headers
legacy_klass.limit(5000).order("RANDOM()").each do |record|
csv << MigratedColumnsValidator.new(get_migrated_record(record), record).call
end
end
end
end
migrated_columns_validator.rb:
class MigratedColumnsValidator
def initialize(migrated_record, legacy_record)
@migrated_record = migrated_record
@legacy_record = legacy_record
end
def call
validate_migrated_columns
end
private
def validate_migrated_columns
return ["NULL", "#{@legacy_record.id}", "NULL", "NULL", false] if @migrated_record.nil?
Rails.logger.info "Validating #{@migrated_record.class.name} id=#{@migrated_record.id} - legacy_id=#{@migrated_record.legacy_id}"
migrated_record_hash = @migrated_record.hash_record
legacy_record_hash = @legacy_record.hash_record
return [
@migrated_record.id,
@legacy_record.id,
migrated_record_hash,
legacy_record_hash,
(migrated_record_hash == legacy_record_hash)
]
end
end
And we'll get the file with the results:
Resources/Infrastructure
As mentioned throughout the article, is important to keep in mind the resources, this will vary from one company to another, some of those are:
- Sidekiq worker memory: The worker will be in charge of executing all the jobs. A recommendation is to split the different sidekiq queues into different workers so jobs can run in parallel.
- The Redis database memory & concurrency: Redis supports concurrency by allowing multiple clients to access the same data simultaneously.
Conclusion
Through careful planning and execution, you can ensure that all data is properly transferred, and that the new system is up and running as soon as possible. With the right strategies in place, data migration can be a smooth process that results in successful and efficient data transfer.